#My Notes for the Certified Kubernetes Application Developer - Part 1, Core Concepts

Recently, I’ve started studying for the Certified Kubernetes Application Developer certificate, CKAD for short, and I thought I would share some of the notes I took in an effort to try and pass this certification. This won’t be a comprehensive view of Kubernetes, but it should give anyone reading it a solid-enough grounding to base their own studies off of. If you find any mistakes here, LET ME KNOW ASAP, as I’m hoping to sit the test in the coming few weeks! I’m hoping to make this a multi-part series that will cover a fair chunk of the content that might be needed to sit the CKAD exam!
The CKAD Curriculum
Before we dive straight in, I guess the first thing we should be doing is considering what will be expected of us from this exam. The exam itself is made up of 7 distinct sections.
- Core Concepts (13%) — This covers the API primitives and how to create and configure basic Pods
- Multi-Container Pods (10%) —This tests your knowledge of the multi-container design patterns such as ambassador, adapter, and sidecar)
- Pod Design (20%) — This is things like how to use Labels, Selectors, and Annotations as well as how deployments work and how to perform rollbacks. Finally, it covers Jobs and CronJobs.
- State Persistence (8%) — This requires knowledge of PersistentVolumeClaims for storage
- Configuration (18%) — This involves understanding ConfigMaps, SecurityContexts, defining an applications resource requirements, creating and consuming secrets and understanding ServiceAccounts
- Observability (18%) — This is for understanding Liveness and Readiness Probes, understanding container logging, as well as how to monitor applications in K8s and understanding debugging.
- Services and Networking (13%) — The final section involves understanding services and demonstrating a basic understanding of NetworkPolicies
A fairly decent number of concepts I’ll have to grasp my head around, and hopefully doable in the short time I have to sit it!
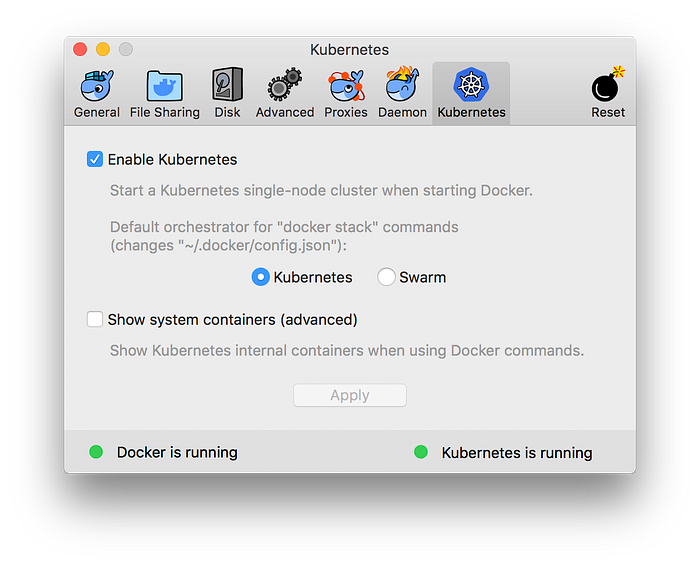
Docker For Desktop + Kube
I’ve previously gone through the trouble of setting up minikube and getting everything ready before you even start learning the basic concepts of Kubernetes and it was not fun. This time around, I opted to use the somewhat-newly release Docker For Desktop with Kubernetes built in!
If you want a quick and easy way to get a single-node cluster built up on your local machine to test things out, then this has to be the only way to go about it.
The Kubernetes CLI
First off, interaction with K8s can be done by using the CLI. This kubectl CLI allows you to do everything you’ll need to do when it comes to managing your Kubernetes cluster. The commands you perform with this kubectl following a structure that looks like this:
$ kubectl COMMAND RESOURCE OPTIONS
The full list of commands can be found by simply typing kubectl and you’ll most likely find yourself using the get , apply , delete or describe commands more than the others, so getting comfortable with these is definitely recommended.
Running a Local Docker Image Repository
I’ve consistently had issues with my internet thanks to BT, and as such, I’ve had to do things mostly in and offline-first way. This was no different, but thankfully I could create new images and push them to a locally running Image repository by first pulling down the registry image from docker hub and then running this on localhost:5000 :
$ docker pull registry
$ docker run -d -p 5000:5000 --restart=always --name registry registry
Whenever I wanted to run a new Docker image within my Kubernetes cluster, I could do so by building it, tagging it and subsequently pushing it like so:
$ docker build -t node-rest-api .
$ docker tag node-rest-api localhost:5000/node-rest-api
$ docker push localhost:5000/node-rest-api
This is handy should you face similar issues and I’ve included it, more for my benefit than for anything else. :D
Pods
We’ll start off with Pods. A Pod is effectively a container for your container/s. Each Pod, within the cluster, will have its own unique IP address from which you can directly access it should you wish, and you may run one or more distinct containers within any given Pod.
Kubernetes does not enforce the use of Docker on you, and lets you choose between a number of container runtimes should you wish to use something else, like rkt or containerd.
Should you wish to scale your application up or down, you must do this by scaling up or down the number of Pods currently running your application. You should not try to run more containers within a given Pod in this scenario.
If you run multiple containers within a single Pod, you can communicate between each of these containers via localhost and each container will have access to the same storage resources, networking resources, and they are guaranteed to be deployed to the same physical host should we need it.
Multi-Container Pods
Now, there are some very valid reasons as to why you would want to include two distinct containers within the same Pod. You could, for instance, want to use the Sidecar Pattern to stream log files to an off-platform logging or monitoring service.
Sidecar Pattern
This is your traditional sidecar pattern, these typically form a single cohesive unit of service — one container which is serving a series of REST endpoints which can be consumed, and the other which deals with the log files generated by any requests to said REST API.
This is actually quite a cool way of doing things if you have to move a non-cloud-native application to a kubernetes cluster and want to quickly “fix” the logging system so that it follows cloud-native practices.
Adapter Pattern
The adapter pattern is typically used when you want to normalize the interface between one app and the outside world. One example of this might be a service that exposes a simple REST API interface, but needs to be adapted to suits your particular needs without redevelopment of the existing API:
Ambassador Pattern
The third and final design pattern in the CKAD curriculum is the ambassador design pattern. One of the most common examples of how this can be used is when connecting to databases.
The Ambassador provides access to a dev database when developing locally, a UAT or Test database when pushed to a testing environment and then ultimately it provides access to the Production database when you are confident with the changes you have made.
Creating Pods
Now that we’ve covered a fair bit of the theory, I guess it’s time to start looking at the practical aspect. So, how do we go about creating Pods? Well, we can define them in a yaml file that looks a little like this:
kind: Pod
apiVersion: v1
metadata:
   name: my-app-pod
spec:
   containers:
     - name: my-app-container
       image: my-app-image:1.0.0
With this specified and our Kube cluster running, we can run this pod on its own by typing:
➜ kubectl create -f mypod.yaml
And we would subsequently be able to see the pod up and running by typing:
➜  node-rest-api kubectl get pods
NAME           READY     STATUS    RESTARTS   AGE
my-first-pod   1/1       Running   0          1m
One thing to note that is creating a Pod is basically all-or-nothing, if anything fails within your Pod then it will return a Failed result. If for any reason one of these fails, you can check to see why it has failed by calling kubectl describe pods and it should give you a rundown of the events that lead up to that failure.
ReplicaSets
ReplicaSets are a layer of abstraction over Pods and they allow you to specify things like the minimum number of desired replica pods running at any one time. Should the number of actual Pods running differ from the desired number, these ReplicaSets continually check for any deviations and bring up more Pods should it need to.
You wouldn’t often deploy a ReplicaSet by itself, you would typically bundle it up into something called a Deployment. Or, if your programs are going to terminate at some point, use a Job or a DaemonSet to run them.
Services
Services are an abstraction layer on top of Pods that allow you to interact with a static IP address.
We could, in theory, go straight to an underlying Pod using its’ IP address, but should that Pod die for any reason, you’ll lose the ability to interact with that service. These Pod IP addresses are not reliable and by having a service front your Pods, you save yourself the hassle of having to update IP addresses everytime a Pod does die.
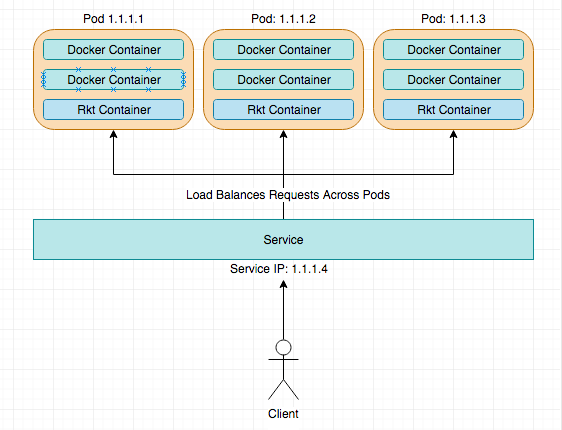
Services typically handle the load-balancing of requests coming in over the Pods that are grouped within them. This grouping takes place due to labels that are placed on both the service and the pod. I.e. if I deployed a service with the label: rest-api, I would need to ensure that I added that same label ‘rest-api’ to my pods.
A service.yml file for a simple service exposed on port 8080 would look something like this:
---
apiVersion: v1
kind: Service
metadata:
   labels:
      app: test
   name: test-service
spec:
   ports:
   - port: 8080
     targetPort: 3000
   type: NodePort
   selector:
      app: test
One of the tricky parts of this was figuring out type: NodePort was needed in order to access this service and the underlying Pods through localhost. Setting NodePort opens up a cluster-wide port through which this service can be hit.
Access to Services
One of the cool things about a kubernetes service is the fact that you can hit any node within the kluster using the right port number, and your request will be automatically routed to a Pod within the cluster running that service.
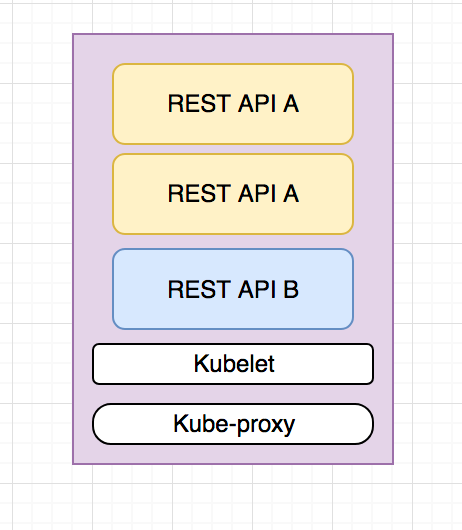
Nodes
Nodes or Minions within a Kubernetes cluster represent individual servers. On these nodes, you can have a number of different pods running and you’ll also have kubelet and kube-proxy running.
The kubelet is a process that constantly runs as an agent on every node and ensures that the containers are running as intended.
Nodes don’t really get asked about within the CKAD exam, however, I feel things might be different for the CKA exam which does loads of stuff with cluster management.
Deployments
Deployments are another level above ReplicaSets and allow us to do cool things such as versioned rollbacks and green-blue deployments.
If you had an application you wish to deploy, you would specify a deployment.yml which would contain a ReplicaSet
---
apiVersion: extensions/v1beta1
kind: Deployment
metadata:
   name: green
spec:
   minReadySeconds: 10
   replicas: 5
   template:
      metadata:
         labels:
            name: green
            app: test
      spec:
         containers:
         - name: application
           image: localhost:5000/node-rest-api
           ports:
             - containerPort: 3000
For some strange reason, I thought that this would be a super object that would expose a service as well, but a deployments main job is to simply deploy (duh…).
It’s through a combined use of Deployments and Services that you can effectively deploy and expose your application. You just need to ensure that the Pods you have in your deployment have labels that match ALL of the labels defined within your service.yml .
Rolling Deployments
When you put an application into production, you’ll most likely want to keep it up at all times. Even, when you are updating that application and deploying a newer version.
Deployments allow us to choose a number of ways to deploy new Pods. We can either Recreate them, or we can do a RollingUpdate.
- Recreate — This particular strategy simply blows away existing containers and redeploys the newer version. It doesn’t necessarily guarantee downtime unless you specify a maxUnavailable number of Pods.
- RollingUpdate — This strategy is by far the more commonly used of the two. It will kill older Pods off as it starts newer Pods and, if you set the liveness and readiness endpoints, it will ensure that there is no downtime of your application when the updates occur. Awesome!
Rollbacks
So, what happens if you fluff something up and a critical bug goes into production? Fear not! K8s’ deployments allow you to easily rollback a failed deployment using the kubectl rollout command.
Every time we do a deployment, K8s automatically stores that as a revision which we can view using the kubectl rollout history deployment command:
➜  node-rest-api kubectl rollout history deployments
deployments "green"
REVISION  CHANGE-CAUSE
1         <none>
2         <none>
3         <none>
As you can see from the above output, I’ve made 3 deployments to my shoddy “green” rest API. If I decided that revision 3 simply wasn’t for me, I could roll all the way back to revision 1 by calling kubectl rollout history deployment green –revision=1 and it would change everything to how it was before, sweet!
Conclusion
This is just part 1 of my notes that I’ve taken for sitting the CKAD exam, hopefully, they are useful to others out there looking to sit the same exam!
We’ve covered roughly 40% of the concepts outlined within the CKAD Curriculum which is available on Github. I’m hoping to have the second part of this series done and dusted by Sunday and then the third, and final part done by Wednesday of next week, so stay tuned for more!
🧙 Note: If you want an exceptionally good resource on learning Kubernetes with a focus on the exam, I can highly recommend Matthew Palmer’s book and course which can be found here: https://matthewpalmer.net/kubernetes-app-developer/#purchase
Share this article
Continue Learning
🎉 2021 in Review 🎉
Let's take a look at the wins of 2021 for the site and the community!
November 2021 in Review
The recap for November 2021
2019 in Review - A Massive Year for TutorialEdge
2019 has been an exceptional year for TutorialEdge and myself and in this post I cover all the things that have happened in 2019!
Migrating to Hugo
A quick look at why I choose to migrate the site from a Laravel 5 based system to hugo